
Personally, I only wear a few pairs of shoes. I’m not into having a different pair for every outfit. My shoes are functional, not decorative.
For my dolls, however, I have an entirely different philosophy. There is no such thing as “too many shoes”. They simply MUST have a different pair for every change of clothing!
This doll has what I refer to as “ballet feet”. Basically, she looks like she is standing on pointe. Actually, her feet are non-existant. One of the reasons I’ve chosen to make her is to tackle the challenge of making shoes… when there are no feet shapes.

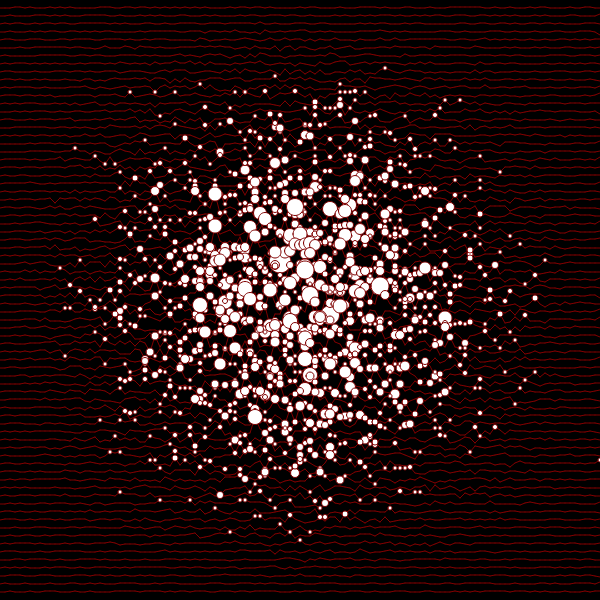
Any Zentanglers out there who made it through my previous posts on generative art may be wondering whether these techniques can be used to draw Zentangles . Let’s try!
Zentangles are built from patterns, called tangles. We’ll try to create a tangle called aah. This is one of the original tangles from the Zentangle originators . There are many variations of aah. We’ll start with a simple 8-armed design. Tandika’s step-out for it looks like this:
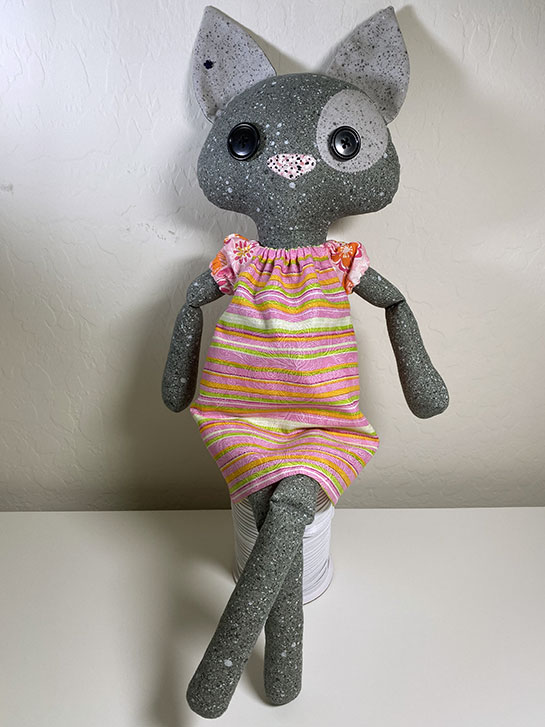
While I was locked away from everyone because of the construction, I managed to make this dress for Tuna.
I used the Striped Dress pattern from the pattern set. Instead of piecing together strips of fabric, I found a fabric that was already striped.
I also started a pair of shoes, but didn’t finish them in time to take a picture, so you’ll have to wait until next week to see them!

Note: Today’s post was originally written and published in November of 2012, on another website I own. I’m sharing it here as a “Throwback Thursday” so that you know my “sudden” interest in dolls is not new and not just a Covid obsession! This post is image heavy. In addition, there are a couple of pictures of an almost anatomically correct, nude doll below!
I thought I would show you a doll I made that was delivered to her owner last week! (Yes, sometimes I do things besides cook! LOL!)


Indeed, she does!
These are from the bloomers/shorts pattern. One niggling problem that I have is that I feel like the waist should be higher up on these. I may adjust the pattern, in the future, for a better fit.
Other than that, I think they’re cute!
#artdoll #catdoll #dressupdoll #sewing #koalaandmilapatterns
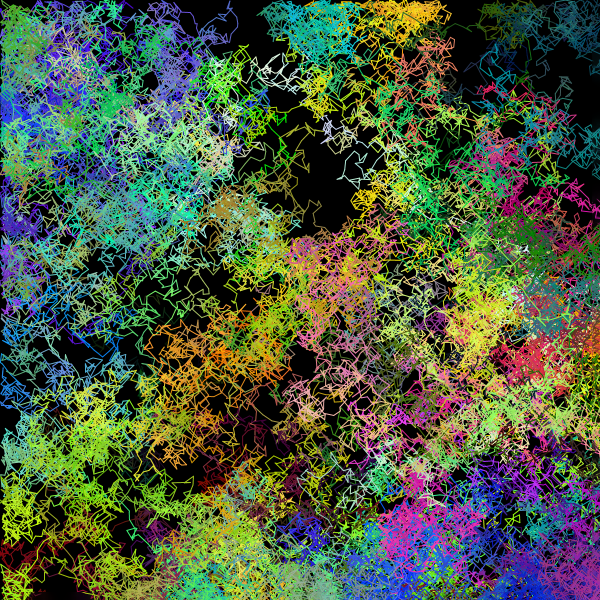
In my last post , I talked about generative art, and showed a simple example using Javascript and the p5.js library. In this post, I’ll show another relatively simple example using slightly different techniques. Basically, the process is still the same: program the computer to generate a simple drawing and add an element of randomness. For this example, I am still using Javascript and p5.js.
Many of you may be unfamiliar with Javascript. In this post, I am using Javascript, and am trying to make it as clear as possible. But I am not trying to teach you Javascript. If you would like to learn more about Javascript or programming in general, there are some excellent on-line resources, some free, some not. Javascript is not the only programming language that could be used, I chose it for this series of posts because it’s probably the easiest to get started with (open the online editor in your browser and just start adding code!) If you are already familiar with another language, there is a good chance you can find a way to do art with it!

How could you resist a kitty like this? From her tiny ear stud to her name tag, she’s a bundle of fun!
I got all of her parts sewn together and stuffed, today.
Tomorrow I will sew on her arms and legs. They are just pinned for the picture. And hopefully, make her some bloomers.
Having fun, staying safe!
#artdoll #catdoll #dressupdoll #sewing #koalaandmilapatterns

Yesterday you saw the back of Tuna-the-Cat. Today, I finished all the applique and button sewing.
I made the name tag out of a piece of muslin. I stamped the name using Archival ink, and then went over it with a Pitt Pen. My signature is on the other half. This will get sewn into the seam when the body is assembled.
I’m very impressed with this new sewing machine. It did a great job of sewing around the applique pieces!


My wonderful husband helped me make a stand for the new doll! I bought a dowel, and a plaque for the base. However, the base wasn’t heavy enough. Later, when he went back to the store, he found this big, round piece of wood. It’s much heavier and works perfectly.
I haven’t sewn the tab onto the back of the doll yet, but this is how it will work.
I am the Artist’s Husband. Yes, I really am Tandika’s husband, and no I am not really an artist. But I am interested in art!
I am a software engineer. Recently, I have been looking in to generative art , or art which is created through some automated means, and I thought I would share some of what I have learned as well as some of the results of my early experiments.

Another walk, another painted rock. Someone is keeping busy!
Stay safe, stay well!

I’m trying out a new art doll pattern. It is from the MadeByMiculinko shop on Etsy. There are several clothing and accessory patterns for the doll, also.
This is a “tilda” style doll, with exaggerated elongation and very wide hips.
I got lucky and had this piece of fabric in my stash. I liked the color, so I went with it.
I like this pattern, but I can make some improvements in this, I think.

One of the things I love about creating new papers for my art journaling stash is that’s it’s just playing! There’s no particular goal… Just applying paint to paper in any way that I feel like. There’s something very calming about the process.
#microart #microartjournal #miniatureartjournal #miniartjournal #miniatureart #tinyjournalnation #allthingstiny #allthingsminiature #microartjournaling #tinyartjournal #travelersnotebook

This beautiful, blue Zentangle was created by CZT Amanda Higbee!
Posted with permission from the artist
Tangles: Toodles

I’m not sure I’m done with this one.
An unexpected color combination appeared early on, so I went for it. I wanted more organic shapes and flow. I think I got a start on that in some areas, but I think it needs more development.
More needs to happen in that hot pink, for sure!
#microart #microartjournal #miniatureartjournal #miniartjournal #miniatureart #tinyjournalnation #allthingstiny #allthingsminiature #microartjournaling #tinyartjournal #travelersnotebook

When I first start a page, I often select “odd” colors, just to see what will happen when I combine them.
The purple/grey/pink combo isn’t really new… or uncommon. Many people like this combination. It’s calm, soothing, with just a bit of “pop”.
The brown/olive/red-orange developed from experimentation. At first, I wasn’t sure about it. That’s one of the reasons why some areas are more “muted”. Then I realized it had a kind of “retro” feel to it. So I went with it, and now I’m happy that I did!

Although today was very busy with non-art things, I did manage to get in some fun painting time! I completed this page of “random acts of art”, using a variety of painting materials, mostly gouache.
I’m finding that I really like using gouache. It’s a bit like using watercolor. But when it dries, it’s a bit more permanent. I can paint over it or next to it without it totally reactivating the dry paint. If I’m careful, I can do all kinds of interesting things that I couldn’t with regular paints.

This week, in the Facebook Micro Art Journaling group, we’re creating “stash builders”.
Today’s assignment is to use whatever art materials we want, or have at hand, to color on any paper. We can try all different types of paper, or junk mail, or whatever we like.
I am using mixed media paper. It was already coated with a thin layer of white gesso. Color was applied using Inktense pencils , Stabilo pencils , Neocolor II , and gouache . I also had a set of Bree Reese, metallic watercolor creams .