
Market haul.
Yes, it wasn’t that much fun, hauling freight from one planetary market to another. And this time, the products were mostly fruit and woven goods. Nothing dangerous.
But this is what pays for the adventures. It keeps the process going smoothly.
We do the necessary to experience the extraordinary!
Zentangle drawn on Strathmore Vellum Bristol using a black, Micron pen. Shading done with graphite pencil.
Tangles: Beadlines Echoism Pokeroot Vink Well

Matt sent me this tile yesterday to post here. I’m always fascinated by the unusual elements he adds to his tangles! Sometimes it is his own interpretation of a tangle, sometimes it’s a tangle that is totally new to me, and sometimes it’s just a small, added tweak that captures my attention.
Zentangle drawn on Strathmore Vellum Bristol using a black, Micron pen. Shading done with graphite pencil.
Tangles: Fescu Pokeroot Striping

She loved this place and it’s tropical feeling weather. It was nice to be in a place where she could sit on a lanai, or wander in an out without realizing it. It reminded her of the home planet… where her ancestors came from.
Zentangle drawn on Strathmore Vellum Bristol using a black, Micron pen. Shading done with graphite pencil.
Tangles: Diva Dance Florez Hollibaugh Lightning Bolt Meer Mooka Easy Trentwith
We had a small, fun class yesterday!
Zentangle drawn on Strathmore Vellum Bristol using a black, Micron pen. Shading done with graphite pencil.
Tangles: Bales Crescent Moon Florz Hollibaugh Printemps

“He who controls the spice controls the universe.” ― Frank Herbert, Dune Zentangle drawn on an Official Bijou tile using a brown, Pigma Micron pen. Shading done with colored and graphite pencils.
Tangles: Molygon

Sometimes, when I don’t have a specific direction for my tangling, I just pull tangles at random.
For this tile, I chose the section of the string first, and then the random tangle.
I wasn’t quite sure what to do, at first, when Vega came out of the tangle jar. I’m used to drawing it as a border or a ribbon, rather than a fill. But I have to say, I might use it more often after this… I really like the results.

Over the weekend, I received this picture of a tile Matthew created!I’m not sure of all the tangle names… perhaps some of them don’t even have names. But it doesn’t matter… It’s still a great tile!
Zentangle drawn on a black Official Zentangle Apprentice tile using a white Sakura Gelly Roll. Highlights done with white charcoal pencil.
Tangles: Paradox Aura Leah Tipple

All over.
Amanda (Amanda Higbee, CZT) sent me this picture on Saturday. It was something she had been working on for a few days.
Amanda says that she saw something like this on line, and wanted to give it a try. I asked her which tangle it was, and she wasn’t sure… she thinks Cyme is the closest. To me, it reminds me of Garlic Cloves, or Ravel.
But no matter what you call it, I love it! The color variations keep an all-over design from becoming boring!

No matter which tangle you choose, there are usually many different ways to draw it.
Take Hollibaugh, for example. I’ve used curved, filled, flared, “holyhollibaugh”, coffered, wrapped, auraed, woven, swerved and mummy versions, to name a few.
So I thought it might be good to have a way to keep track of these versions all in one place. That way, I would have a reference of styles to choose from.

Adaptation.
I recently had someone tell me that they never use Cadent when they are tangling. They don’t like it because they can’t get all the shapes to be “even”.
One of the the things that is great about tangling is that you can adapt whatever tangle you choose to work with your own style and ability!
So, today’s tile is a monotangle of Cadent… drawn in the “crazy” style. Meaning, there is no grid. I just drew the circles wherever I wanted and then connected them together with an “S” stroke!

I just had to do a tile with a tango, or hybrid of Diva-Dance and Undu! They were such perfect partners… As if they were made for each other!
Zentangle drawn on a tan, Official Zentangle 3Z tile using a dark blue, Pigma Micron PN pen. Shading done with graphite pencil.
Tangles: Diva Dance Undu

Disruption.
Every time the energy returned, it disrupted the planetary patterns. She knew it was time to travel again, to take the ship out. But the energy patterns just didn’t allow for it then. She would study the patterns… perhaps there was a way.
Zentangle drawn on Strathmore Vellum Bristol using a black, Micron pen. Shading done with graphite pencil.
Tangles: Antidots Betweed Flukes Ing Printemps Static

Another Introduction to Zentangle class at Good Gifts Healing Arts!
I am so blessed to be able to share with others!

Kicks!
As you know, I often feature tiles created by my daughter, Amanda Higbee, CZT. But what you might not know, is that her oldest son, Matthew is also a tangler! You can see a few of his tiles in the Guest Gallery. Matthew is almost 18 years old, and this year, he is a Senior in High School.
Amanda sent me these pictures yesterday morning, and I was just blown away!

I love the overall composition of this tile from CZT Amanda Higbee!
Zentangle drawn on an Official Zentangle tile, using a black, Micron pen. Shading done with graphite pencil.
Tangles: Cobbles Floo Hypnotic Msst Purk Printemps Static

This tile was created from Eni Oken’s newest Art Club video, Feziii Tangle .
Feziii, created by Eni, is a different type of tangle because it is procedural, following specific rules. This is an interesting concept for how to draw a tangle. It was a lot of fun!
Shading Feziii requires some serious thinking because, when it’s used as a fill, there are multiple levels overlapping each other. Fortunately, the video gives you great instructions for handling this kind of tangle.

On the back of this tile, created by Amanda, is written:
“If you can’t run, then walk
If you can’t walk, then crawl,
But whatever you do, you have to keep moving forward.”
—Martin Luther King, Jr.
As we are working on tiles, we hear or think of things that we want to remember going forward. So the back of our tiles become a kind of journal, over time, as we write notes on them.

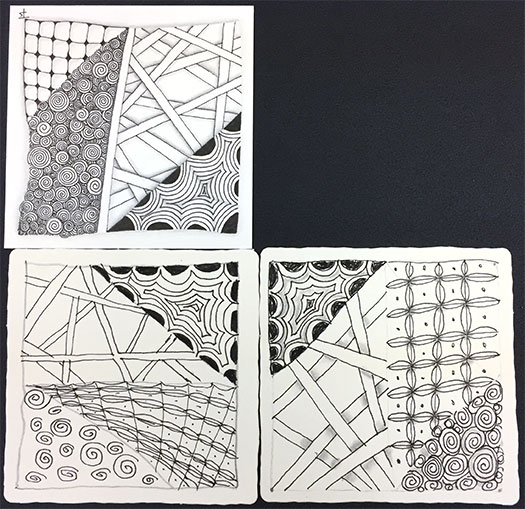
Yesterday I taught a classes at Good Gifts Healing Arts Studio . Above is the mosaic from the Introduction to Zentangle class , including my tile (the one with Florz).
I love sharing Zentangle with others!
Zentangle drawn on Strathmore Vellum Bristol using a black, Micron pen. Shading done with graphite pencil.
Tangles: Bales Crescent Moon Florz Hollibaugh Printemps

Tenacity.
The vine had crept along the back fence for years. It never bothered anyone growing behind the flowers and other shrubbery.
When she noticed it, she reported it to the groundskeepers. They tried to remove it, but it came back again and again.
Maybe there was something to learn there.
Zentangle drawn on Strathmore Vellum Bristol using a black, Micron pen. Shading done with graphite pencil.
Tangles: Icanthis Papyrus

Northwest.
Various parts of the country have a history of native, tribal art which influences the decorative choices of that particular area. Recently, my husband traveled to Portland, Oregon for a business conference. While there, he found a book, "Looking at Indian Art of the Northwest Coast" by Hilary Stewart.
I like the graphic effect produced by using black, white and red. So I decided to give it a try on a Zentangle. I don’t know how effective it is here, but it was an interesting exercise.